Aaron Hipple
I used to play a lot of music with other musicians. Being a jazz musician, it's particularly important to share with other musicians in real-time, since improvisation and the social aspects of music are so key to the style and culture of jazz. As you can imagine, this all fell apart when the COVID-19 pandemic hit the US (and the world) in 2020.
Since then, I've been exploring a few different ways to play music online in a roughly real-time way. Since a few people have asked me how I set this up, I'll outline my configuration and give some guidance on how to recreate it in this post.
The Bits and Pieces
First things first, here's a simple list of the various pieces of gear and software I'm using:
-
Hardware
-
A computer: My trusty early-2010s Lenovo Thinkpad
-
An audio interface: Behrenger UMC404HD
-
Microphone(s): MXL 990 + 991
-
-
Software
-
Instruments
-
Electric guitars
-
Acoustic guitars
-
1969 Giannini Classical
-
-
Installing the software
The Operating System
I've used Linux as my daily driver operating system for quite a long time and it works great for my purposes as an enthusiast/power user because the ecosystem is very "hackable" (in the sense that you can always modify your setup to suit your preferences/needs). This holds true in the audio space as well.
This flexibility does come at the cost of some quirks, as well as the need to diagnose and fix your own problems a bit more often. That said, there's a ton of documentation available on the internet, as well as a large and usually-friendly community of people who are able to help via forums and chat rooms.
I use Arch Linux, as its documentation is best-in-class. The Arch Wiki is a fantastic reference for all things Arch Linux, and is even quite useful as a user of other distributions.
Arch is very power-user-oriented though, so if you're not an experienced user of Linux, you may want to start with a more widely used and beginner-friendly flavor of Linux like Ubuntu. This tutorial on how to install Ubuntu would be a good place to start.
Important Note: There are quite a few ways to run Linux on your computer; many of them involve entirely wiping the computer clean of other data before proceeding with a fresh Linux installation. Be careful to do this only on a computer you're willing to wipe clean (either because it has no important data on it, or all the data has been backed up). It is possible to dual boot Linux and Windows if you wish to preserve your data but, as always, you should be very careful and back up everything you can't afford to lose.
JACK
JACK is an audio connection toolkit that allows you to use any number of Linux audio softwares together. It allows you to make connections in software the same way you might various pieces of hardware and cables.
To control JACK, it's most convenient to also install a graphical
configuration manager. qjackctl is the one that I use.
On Arch Linux, you may install these directly from the Arch repositories using this command:
sudo pacman -S jack2 qjackctl
On Ubuntu, you can use the Ubuntu Software Center, synaptic, or another
package manager to find and install jackd2 and qjackctl. You can also
run this command from a terminal:
sudo apt install jackd2 qjackctlJamulus
Jamulus is a piece of software that allows you to access any of a number of public or private servers where musicians play together. It's optimized for low latency, which allows people to play together live over the internet.
On Arch Linux, you can install jamulus from the Arch User Repository. If you haven't installed an AUR helper, you should be able to run these commands in a terminal to install Jamulus:
# ensure git is installed before attempting to clone from the AUR
command -v git || sudo pacman -S git

# make a folder for AUR builds
export BUILD_DIR="/tmp/build"
mkdir -p "$BUILD_DIR"
cd "$BUILD_DIR"

# clone the jamulus build instructions and enter its directory
git clone https://aur.archlinux.org/jamulus.git
cd jamulus

# build and install jamulus
makepkg -sicr
If you're already using an AUR helper, simply use it to install jamulus:
sudo aura -A jamulus
# ...or...
yay -S jamulus
# ...or...
yaourt -S jamulus
If you're using Ubuntu or another distribution, instructions for downloading and installing Jamulus are provided on the Jamulus website.
Guitarix
Guitarix is a suite of amp simulators and effects that allow you to craft a wide variety of electric guitar sounds. You can use it to get a more realistic "amplified" found from an electric guitar that's plugged directly into your audio interface.
On Arch Linux, you may install it directly from the Arch repositories using this command:
sudo pacman -S guitarix
On Ubuntu, use your package manager of choice to find and install
guitarix. You can also run this command from a terminal:
sudo apt install guitarixPutting it all together
Setting up the hardware
First, you'll want to have everything plugged in to your audio interface, and have your computer turned on. I run in two main configurations:
Electric Guitar
For an electric (or primarily-electric guitar, like my D'Angelico hollowbody electric), I'll use a microphone into the first channel of my audio interface and a direct 1/4" cable from the guitar into a second channel of the interface. I'll then use the levels on the interface to blend these sounds together.
I've found that even with a solid-body electric, it's nice to capture a bit of the acoustic "picking" sound in some cases, particularly when comping. You can get a nicer "strumming" sound that way. This is, of course, even nicer-sounding with the richer acoustic sound of a hollowbody electric guitar. Usually to accomplish this, I'll position the microphone approximately 12" from the 12th fret of the neck, pointed toward the picking hand.
Acoustic Guitar
For an acoustic guitar, I'll use two microphones through two channels of the interface, set to approximately the same level. If the microphones aren't a matched pair (mine aren't), you may need to match the levels approximately by ear.
I'll aim these microphones differently depending on the guitar. For a flattop acoustic, I'll start with one "neck" microphone and one "bridge" microphone, both 12 to 18 inches away from the guitar. Use your ears to find your favorite placement.
Setting up the software
Configure and start JACK with qjackctl
Once you're all wired up, you'll need to start up the audio engine.
First open qjackctl. It'll look like this:
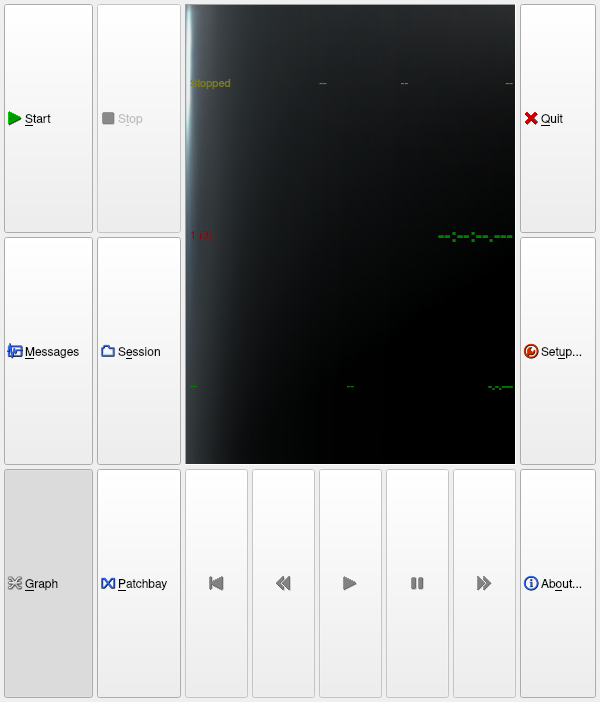
qjackctl after opening
Then, you'll want to adjust some settings on the Setup screen. The main things to fix here are:
-
Select your audio interface
-
Set the Sample Rate to 48000
-
Set Frames/Period and Periods/Buffer to optimize latency (more below)
I use 128 Frames/Period and 2 Periods/Buffer when playing online with Jamulus. If you experience crackling or dropouts, you may want to use higher values. If your hardware is powerful enough, you may be able to reduce these values.
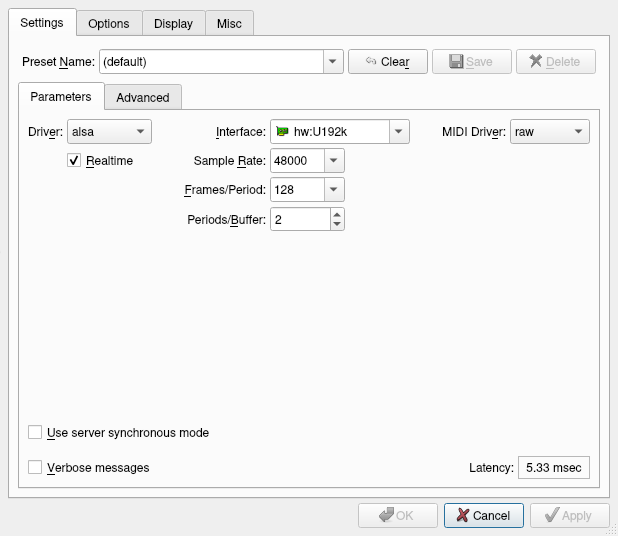
qjackctl setup dialog
Once you've set these values, click OK and return to the main view. From here, click Start to start the JACK daemon in the background.
Start and configure guitarix
Once JACK is running, you should be able to fire up guitarix if you're using an electric guitar. Having done that, you may want to experiment with your settings to ensure your guitar sounds the way you want it to sound.
To do this, use the Graph tool in qjackctl to connect the relevant input
channel to guitarix's input, and the output from guitarix to the output
from your audio interface. With my interface and system, that
configuration looks like this:
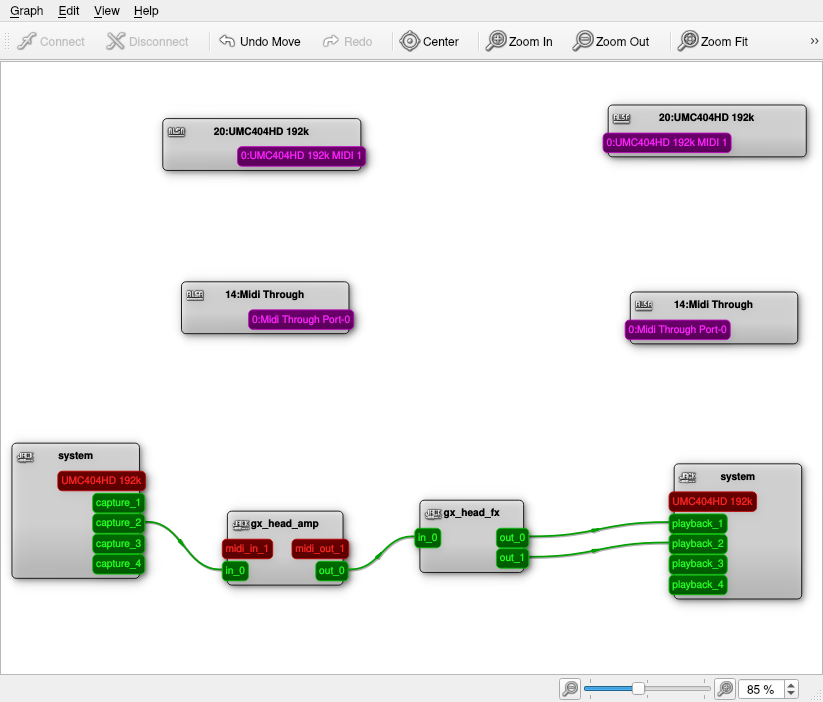
qjackctl and Guitarix wired up directly to audio interface
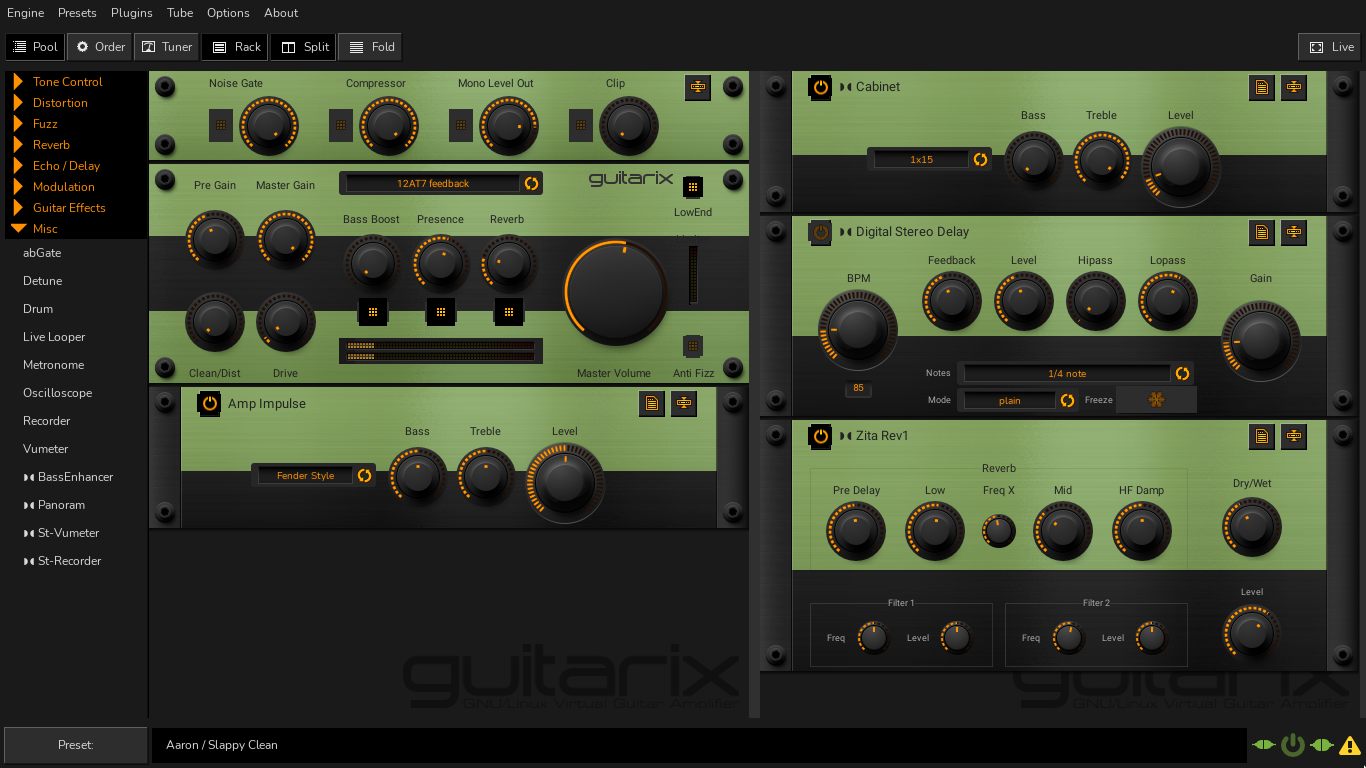
Once you've done this, turn up the guitar's channel on your interface and test that sound is coming through. If you've got a signal, use the configuration interface of guitarix to dial in a sound that suits you. Right now I'm playing my Telecaster with a configuration like this:
Start and configure jamulus
Once you're happy with your sound in Guitarix, it's time to connect it
to Jamulus. First, start Jamulus, then open the qjackctl graph view and
disconnect the Guitarix outputs from your audio interface's outputs.
You'll want to connect everything through Jamulus so that you don't hear
any "direct" signal and instead hear everything with the round-trip
latency imparted by Jamulus. This will allow you to stay in sync with
other musicians as you play.
When blending an electric signal from guitarix with an acoustic signal from a microphone, the graph looks like this:
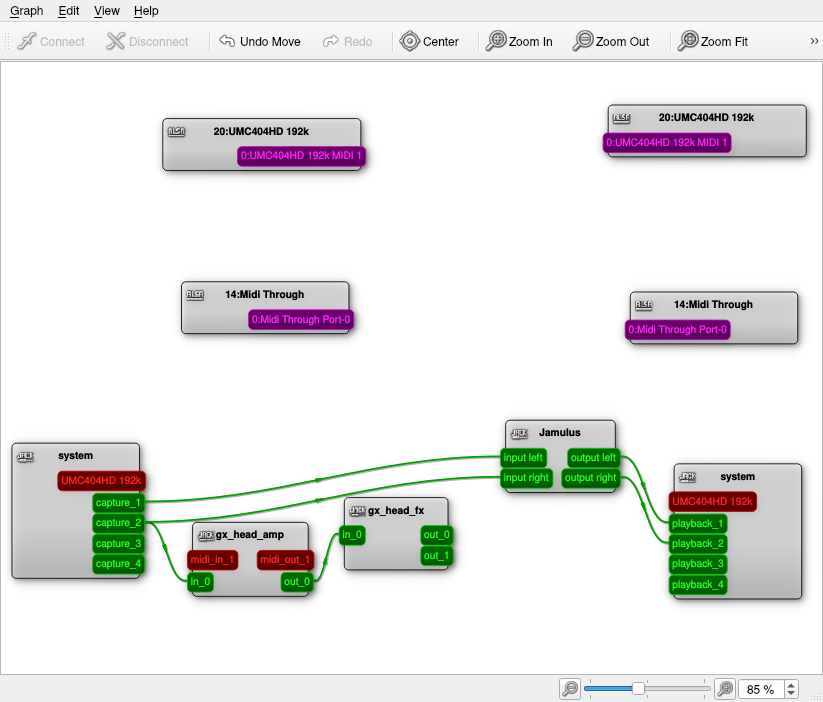
qjackctl graph with everything wired through Jamulus
Note here that channel 1 (a microphone) is run to both the left and right inputs of Jamulus, and that channel 2 (the electric guitar signal) is running through the full guitarix signal chain before also being connected to both the left/right inputs in Jamulus.
Once you've got this wired up, go back to Jamulus and check your Settings. Mine look like this:
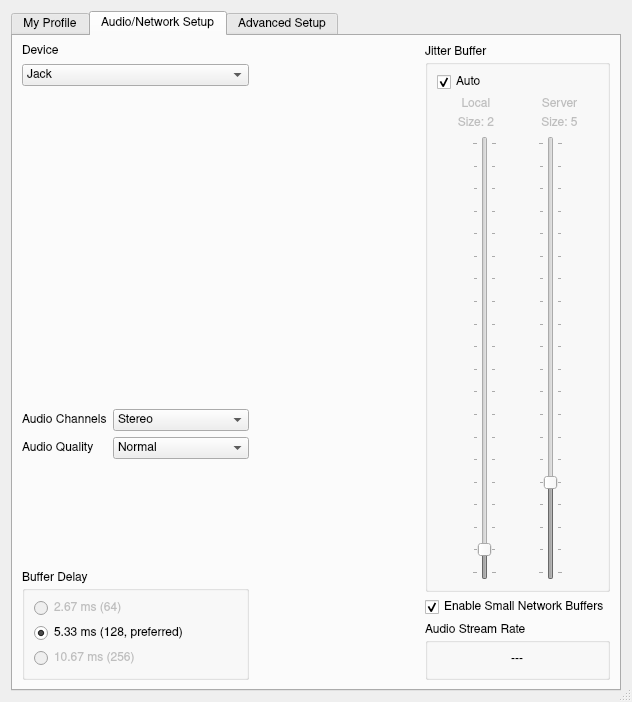
When you're happy with your settings, click Connect, then choose a server to join. Ensure that Mute Myself is engaged, and then test your signal to ensure Jamulus is receiving it/passing it through to your outputs. If the signal is good, you can then unmute yourself and play!
Odds and Ends
Beyond this setup
The beauty of JACK and the Linux audio ecosystem is that most of the
softwares can be mixed-and-matched. If you want to add a signal
processor that isn't included with Guitarix, you can start it up
(possibly running in another plugin host like Carla) and use qjackctl to
connect it into your signal chain using the graph. If you wish to record
your session, you can install a digital audio workstation like ardour
and likewise connect the pieces with qjackctl.
Particularly when playing an acoustic guitar, I like to add a little
compression and reverb to my signal. This is quite doable with Carla,
qjackctl, and the wide variety of audio applications available for
Linux.
MIDI
JACK also deals in MIDI transport, so you can use a MIDI controller to drive virtual instruments, to control settings within Guitarix, and much much more.
Raspberry Pi
I believe it would be quite possible to run this sort of setup on a Raspberry Pi – especially in the later models, they're fairly powerful machines (for the cost) and may have enough processing power to run this sort of audio setup. That said, I have not tried to spin this up myself, so I can't guarantee that this setup will in fact work as-documented here on a Pi.
Notably, Jamulus as packaged in the Arch User Repository is only
available for x86_64 architectures (i.e. a typical Intel or AMD
processor, not an ARM chip as used by the Pi and similar boards). It may
be possible to build Jamulus from source on an ARM machine, but I
haven't tried it.